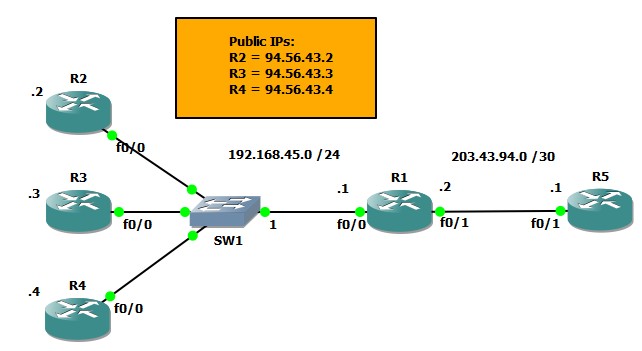
I have seen quite a lot of ask the question, “how do I NAT multiple public IPs to multiple inside hosts?”. I think what confuses most people is when they are given two different subnets. As per the diagram below, R1 has a 203.43.94.x address for its internet connection and a 94.56.43.x range for its internal hosts.
This type of configuration is known as “one to one” NATing. What it does is statically map an internal host’s IP address to an external IP address.
Note: Please also see the Single Public IP NATing to Multiple Hosts post for a similar setup but using only a single public IP address.
As per the diagram below, the mappings are as follows:
- R2’s Private IP is 192.168.45.2 and its public IP is 94.56.43.2
- R3’s Private IP is 192.168.45.3 and its public IP is 94.56.43.3
- R4’s Private IP is 192.168.45.4 and its public IP is 94.56.43.4
With these mappings, all traffic sent from R2 on to the internet will leave with a source IP address of 94.56.43.2. When traffic is sent from R3 on to the internet, it’s source IP address will be 94.56.43.3, and so on.
The true is in reverse too. For example, when traffic from the internet is sent to 94.56.43.2, it will be sent to the host with the IP address 192.168.45.2 (R2), when traffic from the internet is sent to 94.56.43.3, it will be sent to the host with IP 192.168.45.3 (R3), and so on.
In the above topology, Routers R1 through to R4 are used to emulate a LAN network, and the connection between R1 and R5 are used to emulate a standard internet connection.
Please note that routers R2 through to R4 can be replaced by any network enabled device(s). I have only used routers in this example as they are the only devices that can be emulated by GNS3.
As you would on any network host (e.g a PC, laptop, server, etc), router’s R2 through to R4 have basic configurations on them - simply an IP address and a default route pointing to R1’s fa0/0 interface. Here is an example:
R2:
R2#sh run int fa0/0
 Building configuration...

Current configuration : 97 bytes
 !
 interface FastEthernet0/0
 ip address 192.168.45.2 255.255.255.0
 duplex auto
 speed auto
R5 also has a basic configuration on it, however, in the real world it would be administered by an ISP so I won’t delve in to it’s setup.
Now let’s talk about R1. This is where all the magic happens.
Interface fa0/0 and fa0/1 are configured the way you’d expect - (note the “ip nat inside” and “ip nat outside” commands):
R1:
interface FastEthernet0/0
 ip address 192.168.45.1 255.255.255.0
 ip nat inside
 !
 interface FastEthernet0/1
 ip address 203.43.94.2 255.255.255.252
 ip nat outside
This is a standard setup for any NAT configuration. Now for the special part:
ip nat inside source static 192.168.45.2 94.56.43.2
ip nat inside source static 192.168.45.3 94.56.43.3
ip nat inside source static 192.168.45.4 94.56.43.4
It’s as simple as that! In case you are unfamiliar with the “ip nat inside source static” command, it is actually very simple. The first IP address is that of the internal host and the second IP address is the public IP address you’d like to map to the internal host.
Now let’s take a look at R1’s NAT table:
R1(config)#do sh ip nat trans
Pro Inside global      Inside local       Outside local     Outside global
--- 94.56.43.2         192.168.45.2       ---                ---
--- 94.56.43.3         192.168.45.3       ---                ---
--- 94.56.43.4         192.168.45.4       ---                ---
And now let’s send some some test traffic and see the results. As R5 is used to emulate an internet host, we’ll use it to send test data to the internal hosts through their corresponding public IP addresses.
Here is a ping from R5 to R2’s public IP, 94.56.43.2:
R5#ping 94.56.43.2

Type escape sequence to abort.
 Sending 5, 100-byte ICMP Echos to 94.56.43.2, timeout is 2 seconds:
 !!!!!
 Success rate is 100 percent (5/5), round-trip min/avg/max = 12/50/96 ms
 R5#
And here is the NAT table on R1:
R1(config)#do sh ip nat trans
Pro Inside global      Inside local       Outside local     Outside global
icmp 94.56.43.2:0      192.168.45.2:0     203.43.94.1:0      203.43.94.1:0
--- 94.56.43.2         192.168.45.2       ---                ---
--- 94.56.43.3         192.168.45.3       ---                ---
--- 94.56.43.4         192.168.45.4       ---                ---
And for the next example, we’ll telnet from R5 through to R4:
R5#telnet 94.56.43.4
 Trying 94.56.43.4 ... Open
And here is the NAT table on R1:
R1(config)#do sh ip nat trans
Pro Inside global      Inside local       Outside local      Outside global
--- 94.56.43.2         192.168.45.2       ---                ---
--- 94.56.43.3         192.168.45.3       ---                ---
tcp 94.56.43.4:23      192.168.45.4:23    203.43.94.1:23781  203.43.94.1:23781
--- 94.56.43.4         192.168.45.4       ---                ---
As always, if you have any questions or have a topic that you would like me to discuss, please feel free to post a comment at the bottom of this blog entry, e-mail at will@oznetnerd.com, or drop me a message on Reddit (OzNetNerd).
Note: The opinions expressed in this blog are my own and not those of my employer.


Leave a comment