
My collection of Ansible posts is steadily rising, so I thought it would be a good idea to write a post on how you can connect an Ansible VM into GNS3 so that you can practice your automation skills in a non-production environment. While I am using VMware Wrokstation for this post, the process is very similar for VMWare Player and VirtualBox.
- The first thing you need to do is select an OS to run Ansible on. I chose Ubuntu but just about any Linux distro will do.
- Create a VM and install the OS on it. Note that the VM will need internet access so you will need to configure its NIC as either “Bridge” or “NAT” mode.
- Once the VM has internet connectivity, update/upgrade your packages:
apt-get update apt-get upgrade -
If an SSH server is not installed on the VM, install one now:
sudo apt-get install openssh-server -
If the VM is running a firewall, implement a rule which allows SSH traffic through:
sudo ufw allow 22 - (Optional) At this point you might want to SSH to your VM using an application such as Putty or xshell as they’re more feature rich than VMware’s and VirtualBox’s consoles.
-
Add the following lines to your ~/.ssh/config file. (Note that these lines should only be used in a lab environment, not in production):
Host * KexAlgorithms +diffie-hellman-group1-sha1 StrictHostKeyChecking no - Install Ansible using the following commands:
-
sudo apt-get install software-properties-common
sudo apt-add-repository ppa:ansible/ansible
sudo apt-get update
sudo apt-get install ansible
At this point you have the option to move the VM’s NIC to “Host Only” mode or leave it in its current mode. You would make the move if either of the following is true:
- You would like to completely isolate your production environment from your Ansible lab network.
- You would like to use multiple subnets in your Ansible lab network without having to make changes to your VM’s route table.
The only downside of using “Host Only” mode is that your VM loses connectivity to the internet. Having said that, the NIC can be switched back to “Bridge” or “NAT” mode at any time should you need to (e.g for software downloads and/or updates).
As isolating a lab from a production environment is more important the Ansible VM having internet access, this tutorial will cover the use of a “Host Only” NIC.
Note: You can achieve lab isolation while maintaining internet connectivity by installing a second network card in the VM. Please see the appendix for more information.
-
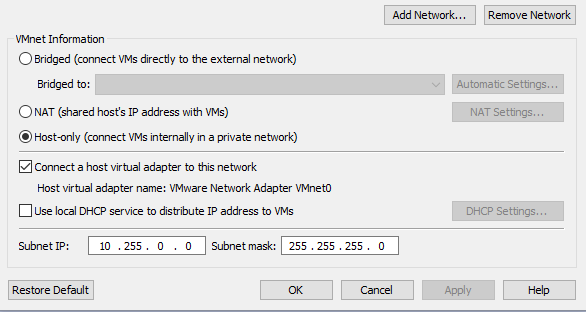
Ensure that the NIC is set to “Host Only” and that the “Connect a host virtual adapter to this network” box is ticked.
-
Next, ensure the virtual adapter is up and running on the host machine.
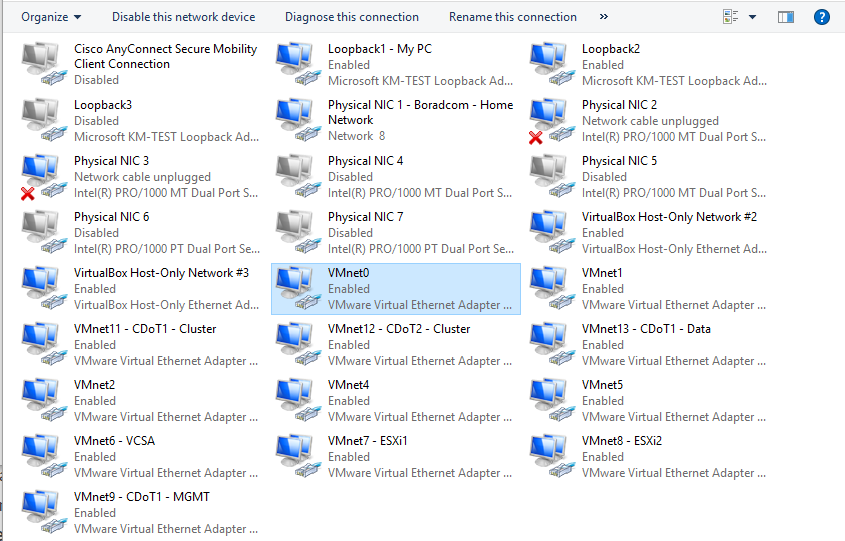
- (Optional) If you’ve just installed/enabled the virtual NIC for the first time, you will need to reboot your PC so that the NIC is visible in GNS3. If the virtual NIC was already installed, a reboot is not required.
-
Open a command prompt as an Administrator and issue the following command:
C:\WINDOWS\system32>sc config npf start= auto [SC] ChangeServiceConfig SUCCESS C:\WINDOWS\system32> -
In GNS3, drag a Cloud object into the topology pane and add the above mentioned virtual adapter to the “Generic Ethernet NIO” box as per the screenshot below.
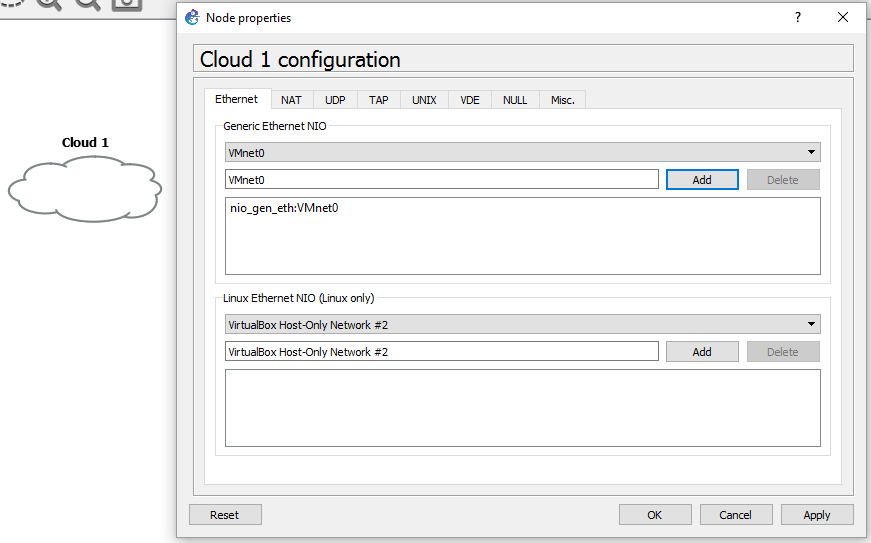
-
Drag a router into the topology pane and then connect the cloud to the router.
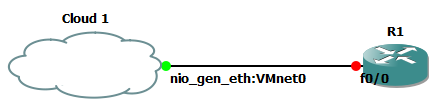
-
Configure the router to have a static IP address on a network which does not conflict with your production network. Also configure a DCHP server for that network. (Note that using a network which overlaps will not cause any issues to the production environment. However, it might cause your PC to have intermittent connectivity issues to your production and/or lab environments.)
conf t int f0/0 no shut ip add 10.255.0.254 255.255.255.0 ip dhcp pool LAB network 10.255.0.0 255.255.255.0 default-router 10.255.0.254 -
As the VM was on another network previously, you will need to release its current IP address and obtain a new one from the router:
sudo dhclient -r sudo dhclient will@ubuntu:~$ ip addr 1: lo: mtu 65536 qdisc noqueue state UNKNOWN group default qlen 1 link/loopback 00:00:00:00:00:00 brd 00:00:00:00:00:00 inet 127.0.0.1/8 scope host lo valid_lft forever preferred_lft forever inet6 ::1/128 scope host valid_lft forever preferred_lft forever 2: ens33: mtu 1500 qdisc pfifo_fast state UP group default qlen 1000 link/ether 00:0c:29:d0:15:db brd ff:ff:ff:ff:ff:ff inet 10.255.0.1/24 brd 10.255.0.255 scope global ens33 valid_lft forever preferred_lft forever inet6 fe80::20c:29ff:fed0:15db/64 scope link valid_lft forever preferred_lft forever -
By default, the virtual adapter on the host machine will be configured to receive a DHCP address as well. This is not ideal because it will receive a default route which points to your GNS3 router and therefore might cause intermittent network connectivity issues. To avoid this issue, assign it a static IP address and no default gateway, like so:
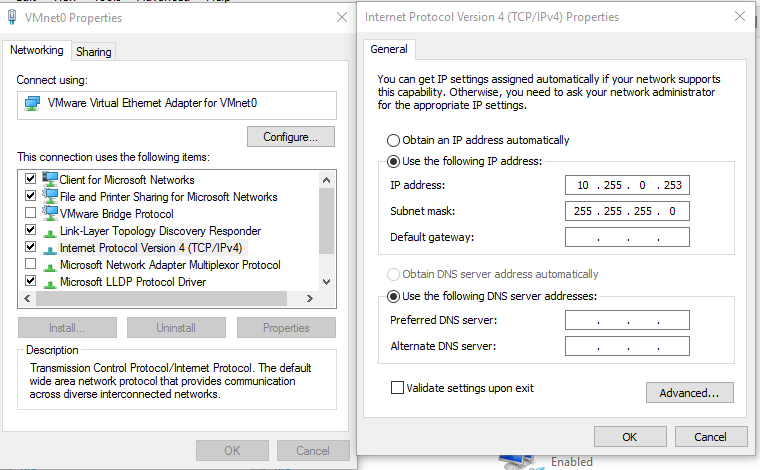
Ethernet adapter VMnet0: Connection-specific DNS Suffix . : IPv4 Address. . . . . . . . . . . : 10.255.0.253 Subnet Mask . . . . . . . . . . . : 255.255.255.0 Default Gateway . . . . . . . . . : -
You should now be able to ping between all of the devices (the GNS3 router, the Ansible VM and the host machine). If either of the pings do not work, disable your firewall(s) temporarily to see if that resolves the issue. If it does, add the necessary firewall rules to resolve the issue.
R1#ping 10.255.0.1 Type escape sequence to abort. Sending 5, 100-byte ICMP Echos to 10.255.0.1, timeout is 2 seconds: !!!!! Success rate is 100 percent (5/5), round-trip min/avg/max = 4/12/24 ms R1#ping 10.255.0.253 Type escape sequence to abort. Sending 5, 100-byte ICMP Echos to 10.255.0.253, timeout is 2 seconds: !!!!! Success rate is 100 percent (5/5), round-trip min/avg/max = 4/8/16 ms -
Now configure SSH, as well as a username and password on the router:
ip domain-name lab crypto key generate rsa modulus 1024 aaa new-model aaa authentication login default local username cisco secret cisco enable secret cisco - Add the router’s IP address to the /etc/ansible/hosts file.
-
Issue the following command below command. If the above steps were completed correctly, you should see the uptime of the GNS3 router:
   will@ubuntu:~$ ansible all -m raw -a 'show version | i uptime' -u cisco -k
   SSH password:
   10.255.0.254 | SUCCESS | rc=0 >>
   R1 uptime is 46 minutes
   Shared connection to 10.255.0.254 closed.
And there you have it! Your very own Ansible & GNS3 lab.
The great news is that as the VM has a default route pointing to the GNS3 environment, you can create massive labs containing as many devices and subnets as you like.
In the screenshot below you can see that two additional routers have been added to the topology. As EIGRP is running between all of the routers, the Ansible VM has connectivity to them all. The cloud object’s image has also been changed to a server and renamed it Ansible so that it matches what the logical topology.
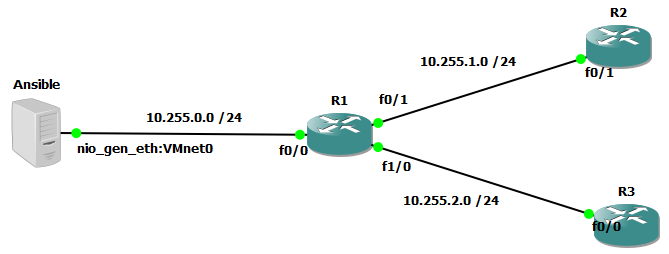
To enable Ansible to control these two routers, we simply add their IP addresses to the /etc/ansible/hosts file and rerun the command we used earlier:
will@ubuntu:~$ ansible all -m raw -a 'show version | i uptime' -u cisco -k
SSH password:
10.255.0.254 | SUCCESS | rc=0 >>
R1 uptime is 53 minutes
Shared connection to 10.255.0.254 closed.


10.255.2.3 | SUCCESS | rc=0 >>
R3 uptime is 1 hour, 21 minutes
Shared connection to 10.255.2.3 closed.


10.255.1.2 | SUCCESS | rc=0 >>
R2 uptime is 1 hour, 22 minutes
Shared connection to 10.255.1.2 closed.
Appendix
In my Getting started with Network Automation post I recommended readers use a VCS like git. There are plenty of free, cloud based options available but if you followed the instructions above, your VM has a “Host Only” NIC which means that it won’t be able to reach these servers.
To rectify this issue while still maintaining the isolation of your lab network, you will need to do the following:
- Add another NIC to the VM and put it in “Birdged” or “NAT” mode. (I’ve got mine set to “Bridged” mode.)
-
On the VM, issue the route command to view the VM’s route table:
will@ubuntu:~$ route
Kernel IP routing table
Destination  Gateway       Genmask        Flags Metric Ref Use Iface
default      10.255.0.254  0.0.0.0        UG    0      0    0  ens33
10.255.0.0   *             255.255.255.0  U     0      0    0  ens33
192.168.0.0  *             255.255.255.0  U     0      0    0  ens38
As per the highlighted line above, the current default route is point to VM’s NIC which is connected to the lab network . This means that it will not be able to connect to the internet:
will@ubuntu:~$ ping 8.8.8.8 PING 8.8.8.8 (8.8.8.8) 56(84) bytes of data. From 10.255.0.254 icmp_seq=1 Destination Host Unreachable From 10.255.0.254 icmp_seq=2 Destination Host Unreachable From 10.255.0.254 icmp_seq=3 Destination Host Unreachable -
Remove the default gateway from the DHCP server configuration on the GNS3 router:
ip dhcp pool LAB no default-router 10.255.0.254 -
Release the IP addresses on the VM and then make new DHCP requests, then take a look at the route table again:
sudo dhclient -r sudo dhclient will@ubuntu:~$ route Kernel IP routing table Destination Gateway Genmask Flags Metric Ref Use Iface default 192.168.0.5 0.0.0.0 UG 0 0 0 ens38 10.255.0.0 * 255.255.255.0 U 0 0 0 ens33 192.168.0.0 * 255.255.255.0 U 0 0 0 ens3 -
Now that the default gateway is pointing out of the production interface, you should now be able to reach the internet. Run the same ping test as before:
will@ubuntu:~$ ping 8.8.8.8 PING 8.8.8.8 (8.8.8.8) 56(84) bytes of data. 64 bytes from 8.8.8.8: icmp_seq=1 ttl=57 time=34.5 ms 64 bytes from 8.8.8.8: icmp_seq=2 ttl=57 time=33.8 ms 64 bytes from 8.8.8.8: icmp_seq=3 ttl=57 time=34.1 ms -
Now we just need to add a few static routes to ensure that all traffic destined to private IP addresses (except for the network which your production NIC is connected to) is directed out of the lab NIC. To make these routes persistent, we need to put them in /etc/network/interfaces :
sudo nano /etc/network/interfaces

# The primary network interface
auto ens38
iface ens38 inet dhcp
auto ens33
iface ens33 inet dhcp

post-up route add -net 192.168.0.0 netmask 255.255.0.0 gw 10.255.0.254
post-up route add -net 172.16.0.0 netmask 255.240.0.0 gw 10.255.0.254
post-up route add -net 10.0.0.0 netmask 255.0.0.0 gw 10.255.0.254
Note that you might need to change the “ens” interface numbers and gateway addresses to suit your VMs configuration.
-
Now restart your network interfaces and take another look at the route table:
will@ubuntu:~$ sudo /etc/init.d/networking restart
[ ok ] Restarting networking (via systemctl): networking.service.
will@ubuntu:~$ route
Kernel IP routing table
Destination     Gateway         Genmask         Flags Metric Ref    Use Iface
default         192.168.0.5     0.0.0.0         UG    0      0        0 ens38
10.0.0.0        10.255.0.254    255.0.0.0       UG    0      0        0 ens33
10.255.0.0      *               255.255.255.0   U     0      0        0 ens33
172.16.0.0      10.255.0.254    255.240.0.0     UG    0      0        0 ens33
192.168.0.0     *               255.255.255.0   U     0      0        0 ens38
192.168.0.0     10.255.0.254    255.255.0.0     UG    0      0        0 ens33
And there we have it. Lab traffic going out of the lab interface, and internet traffic going out of the production interface. This allows us to use git as well as download new packages, update existing packages, etc while still isolating our lab network from the production network.
As always, if you have any questions or have a topic that you would like me to discuss, please feel free to post a comment at the bottom of this blog entry, e-mail at will@oznetnerd.com, or drop me a message on Reddit (OzNetNerd).
Note: The opinions expressed in this blog are my own and not those of my employer.

Leave a comment